Skip to Content
- Säker onlineshopping
- Snabba leveranser
- Hög produktkvalitet
- Vårdpersonal? Klicka här
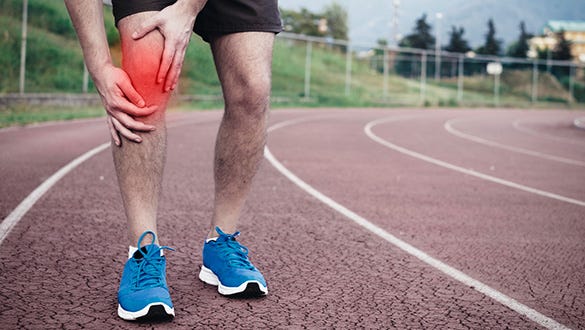
Patellatendinit
Kategorier
Vad är patellatendinit och hur börjar det?
Följande synonymer används för patellatendinit:
- patellaspetssyndrom
- löparknä
- hopparknä.
Knäledens anatomi

En av de leder i kroppen som används mest är knäleden. Lårbenet (femur), skenbenet (tibia) och knäskålen (patella) utgör bendelarna i leden. Knäskålssenan (patellaligamentet) ansluter den nedre änden av knäskålen (patella) till skenbenet. Dess huvudsakliga uppgift är att överföra kraft från låret till underbenet, och därför utsätts den för permanent påfrestning under fysisk aktivitet.
Riskfaktorer och orsaker
Anatomiska faktorer
- Elasticiteten i senorna avtar med åldern
- Felinriktning av knäleden
- Fotmissbildningar
- Förkortade senor eller muskler
- Anatomiska avvikelser, t.ex. hjulbenthet, kobenthet eller en rörelsestörning (dysmetri)
- Medfödd svaghet i ledbanden (slappa ligament)
- Om man tidigare haft Osgood-Schlatters sjukdom, ett smärtsamt tillstånd i knäleden på skenbenets nivå
Yttre faktorer
- Olämpliga skor
- Felaktig teknik
- Alltför hårt underlag, t.ex. asfalt
- Alltför intensiva träningspass
- Onormal påfrestning, till exempel när du ska lära dig en ny idrott eller när du börjar träna alltför entusiastiskt och knäet utsätts för extrema krafter
Idrotter
- Idrotter som medför många hopp – volleyboll, basket, vissa friidrottsgrenar som längdhopp och höjdhopp (det är därifrån namnet hopparknä har kommit)
- Jogging – därför kallas det även löparknä1
- Idrotter med snabba riktningsförändringar – fotboll, handboll
- Idrotter med plötsliga intervallrörelser – tennis, squash, badminton
De olika svårighetsgraderna av patellatendinopatisyndromet

Läkare brukar inte hänvisa till de 4 stadierna eller graderna av patellatendinopati. Denna klassificering i fyra delar är till för att hjälpa patienter att förstå den kliniska bilden.
- Smärta i främre delen av knäet över knäskålens spets
- Smärtan förvärras när man hoppar, landar eller springer
- Smärtan förvärras ibland av långvarigt sittande
- Smärtan uppträder vanligtvis gradvis och är vanligen relaterad till en ökning av idrottsaktiviteten
- Lokal ömhet över knäskålen
- Ofta känns senan mycket stel tidigt på morgonen

De olika allvarlighetsgraderna för patellatendinit
I början känns smärtan vanligtvis bara när man varit fysiskt aktiv. I ett senare skede börjar patienten få ”startsmärta” och har ont under träning, eller till och med under vardagliga aktiviteter som att gå i trappor eller efter att ha suttit länge. Det är typiskt att symtomen är ihållande. Det är ofta en kronisk klinisk bild som kvarstår i flera månader eller till och med år.
Faser med relativt lite smärta åtföljs av faser när smärta uppstår igen efter träning. Patellatendinit kan drabba båda knäna, vilket händer för 20 till 30 % av patienterna. Följande tekniker används för att ställa diagnos: ultraljudsundersökning av blodkärlen, magnetresonanstomografi (MRT), röntgen.
Hur patellatendinit behandlas
Patellatendinit brukar oftast behandlas konservativt, dvs. utan operation. Operation behövs bara om patellaligamentet faktiskt går av. Nedanstående metoder lindrar smärta och kan stoppa progression av patellatendinit.
Fysioterapiövningar
Särskilda övningar stärker musklerna och ökar rörligheten. De kan också förkorta läkningsprocessen om de utförs regelbundet. En läkare kan ordinera fysioterapi. Beroende på fynden kan kompletterande ultraljudsbehandling, TENS (transkutan elektrisk nervstimulering), tvärgående friktionsmassage (en särskild form av massage av de drabbade muskel- och senfibrerna), stötvågsbehandling eller manuell behandling eventuellt rekommenderas.
Stretching
Regelbunden stretching av musklerna över framsidan av låret minskar spänningen på knäskålen.
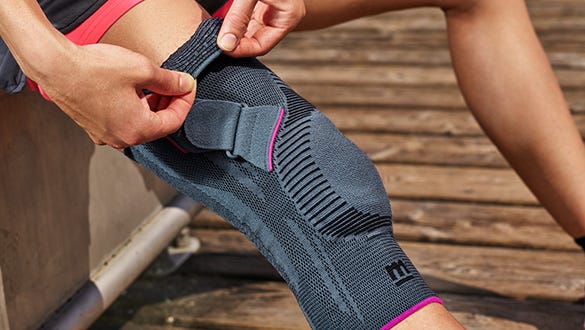
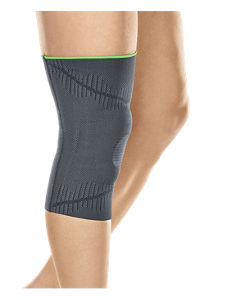
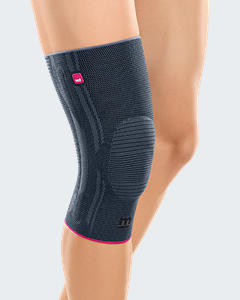
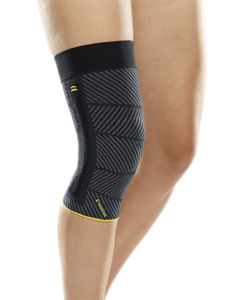
Stöd
Medicinska specialstöd stabiliserar knäleden. Knästöd med ett remsystem, t.ex. Genumedi PSS från medi, passar särskilt bra för en specifik reduktion av det maximala trycket och spänningskrafterna som verkar på patellaligamentet.
Avkylning
Mild kylbehandling med kylpack lindrar smärta (kylskåpstemperaturer på cirka 7°).
Värme
A heat pad can promote blood circulation around the tendons.
Medicinering
Vid behov kan läkarna föreslå att patienten tar antiinflammatoriska läkemedel under en vecka eller två.
Salvor
ka krämer eller salvor kan masseras in på det drabbade området flera gånger om dagen. Detta främjar återhämtningen.
Inläggssulor
Ortopediska inläggssulor korrigerar kroppshållningen och ger kontinuerligt stöd åt knäleden.
Massage
Massage lindrar muskelspänning och smärta. Erfarna fysioterapeuter kan få musklerna att slappna av och öka cirkulationen med bara några få massagegrepp.
Behandling ska anpassas efter den enskilda patientens särskilda behov och den exakta kliniska bilden. Patienter med hållningsproblem rekommenderas att vända sig till en osteopat.
Komplett fysioterapiprogram för hopparknä
Förutom de enbensknäböj på en bräda med 25° lutning som beskrivs ovan, kan andra övningar göras för att stabilisera knäleden och på lång sikt stärka ledbandet i knät. medi har tillsammans med dr Matthias Marquardt, idrottsläkare och aktiv idrottare, sammanställt ett träningsprogram. Det omfattar elva övningar, inklusive den enskilt viktigaste övningen som beskrivs ovan, som kan göras snabbt och enkelt hemma. I videorna visar dr Matthias Marquardt, tillsammans med triatleten och fysioterapeuten Laura Philipp, hur man utför övningarna korrekt – helst tre gånger i veckan.
råga först din läkare om övningarna är lämpliga för dig.
Koordination
Övningar på stabiliseringsdynan är perfekta för att utveckla balans och koordinationsfärdighet. Utför dessa barfota. Tack vare det mjuka skummaterialet sjunker du ner en aning i mattan och måste kompensera för den instabilitet som det medför. Detta ökar proprioceptiva färdigheter (proprioception = kroppens medvetenhet i rummet) och stärker de djupare musklerna.
Stå på ett ben
Involverade muskler: fot- och höftmuskulatur
Utrustning:
- Stabiliseringsdyna (alternativt: hoprullad handduk, hopvikt yogamatta)
Startposition:
- Stå på ett ben, barfota och upprätt, på stabiliseringsdynan
- Håll knät på benet du står på lätt böjt
- Lyft upp det andra benet (enbensstående) (fig. 1)

Övning:
-
Lyft det fria benet och båda armarna bort från kroppen (fig. 2)
-
För nu långsamt armarna och det fria benet tillbaka mot kroppen (långsam "sprattelgubbe-rörelse")
-
Nu måste du hela tiden kompensera för den instabilitet som stabiliseringsdynans mjuka yta skapar
-
Detta aktiverar automatiskt din fot- och höftmuskulatur
-
Se till att hålla dina bålmuskler spända och bibehåll en upprätt hållning
-
För att göra detta, spänn dina magmuskler och gör dig så lång som möjligt
Variationer:
- Gör övningen lättare genom att utföra den på en hård yta (utan stabiliseringsdynan).
Sprattelgubbe
Berörda muskler: fot- och bålmuskulatur
Utrustning:
- Stabiliseringsdyna (alternativt: hoprullad handduk, hopvikt yogamatta)
Startposition:
- Stå på ett ben, barfota och upprätt, på stabiliseringsdynan.
- Håll knäet på det ben du står på lätt böjt (fig. 1)

Övning:
- Nu måste du hela tiden kompensera för den instabilitet som stabiliseringsdynans mjuka yta skapar
- Detta aktiverar automatiskt din fot- och höftmuskulatur
- Se till att hålla dina bålmuskler spända och bibehåll en upprätt hållning
- Det gör du genom att spänna magmusklerna och göra dig så lång som möjligt
Variationer:
- Gör övningen lättare genom att utföra den på en hård yta (utan stabiliseringsdynan).
- Gör den svårare genom att rita ”åttor” (med det fria benet) (fig. 2).
- Gör den svårare genom att lyfta det fria benet upp till höften (fig. 3).
- Gör den svårare genom att sluta ögonen.
Mini knäband
Involverade muskler: fot- och höftmuskulatur
Utrustning:
- Stabiliseringsdyna (alternativt: hoprullad handduk, hopvikt yogamatta)
Startposition:
-
Stå på ett ben, barfota och upprätt, på stabiliseringsdynan.
-
Håll knät på benet du står på lätt böjt.
-
Sträck ut dina armar och ditt fria ben som en förlängning av din överkropp och luta dig framåt i en vinkel på omkring 20° (fig. 1).

Övning:
-
Gör nu mycket små knäböj med benet du står på (till ungefär 30°) (fig. 2)
-
Du måste hela tiden kompensera för den instabilitet som stabiliseringsdynans mjuka yta skapar
-
Detta aktiverar automatiskt din fot- och höftmuskulatur
-
Dina armar, din bål och det lyfta benet ska bilda en rak linje
-
Se till att hålla dina bålmuskler spända.
-
Se till att benets axel är rak.
-
Undvik en kobent ställning.
Variation:
- Gör övningen lättare genom att utföra den på en hård yta (utan stabiliseringsdynan).
Dos:
-
Upprepa övningen 10 gånger.
-
Gör tre set på varje ben.
-
Vila 15 sekunder mellan varje set
Styrketräning
En dynamisk övning består av två olika rörelsefaser: den excentriska och den koncentriska fasen
Under den koncentriska fasen (startfas, positiv dynamisk) övervinns ett motstånd. När det gäller enbensknäböj vore detta rörelsen för knästräckning, under vilken kroppsvikten pressas uppåt. Muskeln – i det här fallet lårmuskeln – förkortas. Muskelns ursprung och fäste flyttas närmare varandra under rörelsen. Koncentriska rörelser kallas ofta också för positiva rörelser.
Under den excentriska fasen (eftergivande, negativ dynamisk) ger musklerna efter för tyngdkraften. När det gäller enbensknäböj vore detta rörelsen för knäböjning, under vilken kroppsvikten saktas in (bromsande rörelse). Muskeln – i det här fallet lårmuskeln – förlängs. Muskelns ursprung och fäste flyttas längre ifrån varandra. Musklerna sträcks ut under belastningen. Excentriska rörelser kallas ofta också för negativa rörelser.
Att utföra excentriska rörelser har visat sig ge särskilt goda resultat vid behandling av hopparknä.
Knäövningar med ett ben
Involverade muskler: lårets framsida och ledbandet i knät (patellarligamentet)
Startposition:
-
Stå upprätt på ett ben på en plan och fast yta.
-
Håll knät på benet du står på lätt böjt.
-
Lyft upp det andra benet (enbensstående) (fig. 1).

Övning:
-
Gör nu knäböj med benet du står på (upp till ungefär 60°).
-
Skjut din rumpa bakåt medan du gör det (fig. 2).
-
Se till att hålla dina bålmuskler spända.
-
Skjut inte ditt knä framför dina tår.
-
Se till att benets axel är rak.
-
Undvik en kobent ställning.
-
Utför övningen långsamt och under god kontroll.
Variationer:
-
Gör övningen lättare genom att hålla dig fast i något (t.ex. en ledstång, en terapistav eller ett skaft på en sopborste).
-
Gör övningen svårare genom att stå på en bräda med 25° lutning
Enbensknäböj med lutande bräda
Involverade muskler: lårets framsida och ledbandet i knät (patellarligamentet)
Utrustning:
- Bräda med 25° lutning
Startposition:
-
Stå upprätt på ett ben på brädan med 25° lutning
-
Håll knät på benet du står på lätt böjt
-
Lyft upp det andra benet (enbensstående) (fig. 1)

Övning:
-
Gör nu knäböj med benet du står på (till ungefär 60°) (fig. 2).
-
Se till att hålla dina bålmuskler spända
-
Skjut inte ditt knä framför dina tår
-
Se till att benets axel är rak
-
Undvik en kobent ställning
-
Utför övningen långsamt och under god kontroll.
Variationer:
-
Gör övningen lättare genom att stå på en plan och fast yta
-
Make the exercise easier by holding on to something (e.g. aör övningen lättare genom att hålla dig fast i något (t.ex. en ledstång, en terapistav eller ett skaft på en sopborste)
-
Gör övningen svårare genom att lägga till ytterligare vikt (t.ex. en ryggsäck med vikter)
Utfall
Involverade muskler: muskler på baksida lår och rumpa
Startposition:
-
Stå upprätt med fötterna höftbrett isär
-
Gör ett långt utfallssteg bakåt, så att hälen på det bakre benet inte når golvet
-
Håll dig upprätt och håll din rygg rak (fig. 1)

Övning:
-
Håll din rygg rak, sänk ner det bakre knät mot golvet och skjut det främre knät framåt (fig. 2)
-
Res nu upp din kropp lite igen
-
Sänk sedan ner det bakre knät mot golvet igen och skjut det främre knät framåt
-
För att förstärka den excentriska träningen, kan du skjuta knäspetsen framför dina tår
-
Utför övningen långsamt och under god kontroll
Variation:
- Gör övningen svårare genom att stå på en bräda med 25° lutning
Utfallssteg med lutande bräda
Involverade muskler: muskler på baksida lår och rumpa
Utrustning:
- Bräda med 25° lutning
Startposition:
-
tå upprätt med fötterna höftbrett isär på en bräda med 25° lutning
-
Gör ett långt utfallssteg bakåt med det andra benet, så att hälen på det bakre benet inte når golvet
-
Håll dig upprätt och håll din rygg rak (fig. 1)

Övning:
-
Håll din rygg rak, sänk ner det bakre knät mot golvet och skjut det främre knät framåt (fig. 2)
-
Res nu upp din kropp lite igen
-
Sänk sedan ner det bakre knät mot golvet igen och skjut det främre knät framåt
-
För att förstärka den excentriska träningen, kan du skjuta knäspetsen framför dina tår
-
Utför övningen långsamt och under god kontroll
Variation:
- Gör övningen lättare genom att stå på en plan och fast yta.
Bron
Involverade muskler: muskler på baksida lår och rumpa
Utrustning:
- Yogamatta (alternativt: en handduk)
Startposition:
-
Lägg dig ner på rygg
-
Placera båda hälarna på golvet (fig. 1)

Övning:
-
Tryck upp ditt bäcken mot taket
-
Spänn dina sätesmuskler och dra din navel mot din ryggrad (fig. 2)
-
Låt nu ditt bäcken långsamt sjunka tillbaka ner
-
Lyft sedan långsamt upp ditt bäcken igen
-
Var noga med att hålla rätt avstånd mellan dina vrister och din rumpa.
-
När du har lyft upp ditt bäcken, bör dina knän vara böjda 90°
Variation:
- Gör övningen svårare genom att utföra den på ett ben (håll det fria benet i luften med höften och knät böjda)
Vadlyft
Involverade muskler: vadmuskler
Utrustning:
- En trappa (gärna med ledstång)
Startposition:
-
Stå med båda fötternas främre trampdynor på kanten av ett trappsteg (i t.ex. en trappa)
-
Böj dina knän en aning

Övning:
-
Spänn dina sätesmuskler och dra din navel mot din ryggrad (fig. 2).
-
Låt nu ditt bäcken långsamt sjunka tillbaka ner.
-
Lyft sedan långsamt upp bäckenet igen
-
Se till att du har rätt avstånd mellan anklarna och rumpan
-
När du har lyft upp ditt bäcken, bör dina knän vara böjda 90°.
Variations:
- Gör övningen svårare genom att utföra den på ett ben (håll det fria benet i luften med höft och knä böjda)
Dos:
-
Upprepa övningen 10 gånger
-
Gör tre set
-
Vila 30 sekunder mellan varje set
Stretchning och fasciaträning
Stretchning och fasciaträning kan lindra spänningen i det smärtsamma ledbandet i knät (patellarligamentet). Fascia är bindvävsstrukturer som omger och stabiliserar musklerna. En fasciarulle stimulerar cirkulationen i vävnaderna för att förbättra vilospänningen i muskelvävnaden.
Höft-ländmuskeln (iliopsoasmuskeln)
Involverade muskler: höft-ländmuskeln (iliopsoasmuskeln)
Utrustning:
- Yogamatta (alternativt: en handduk)
Starting position:
-
Stå i positionen för ett långt utfallssteg
-
Låt ditt bakre knä vila mot golvet
-
Håll dig upprätt och håll din rygg rak (fig. 1)

Övning:
-
Pressa dina höfter framåt med händerna tills du känner en spänning i ljumsken (fig. 2)
-
Se till att du inte skjuter knäspetsen framför dina tår
-
Om du tycker att trycket mot din knäskål är obehagligt, kan du använda en mjukare yta
Dos:
-
Rulla bakåt och framåt 10 gånger
-
Gör tre set på varje sida
-
Vila 30 sekunder mellan varje set
Lårets framsida
Involverade muskler: lårets framsida
Utrustning:
- Yogamatta (alternativt: en handduk)
Startposition:
-
Lägg dig ner på sidan på golvet
-
Böj både knät och höften på det undre benet i en 90° vinkel (fig. 1)

Övning:
-
Ta tag i din fotled och dra det övre benet bakåt tills du känner stretchningen i lårets framsida (fig. 2)
-
Se till att du håller ditt lår parallellt med golvet
-
Spänn alltid dina magmuskler och undvik svankrygg
Lårrullning
Involverade muskler: musklerna på lårets framsida
Utrustning:
- Fasciarulle (t.ex. från Blackroll®)
- Valfritt: yogamatta
Startposition:
-
Lägg dig på magen
-
Placera massagerullen under musklerna på framsidan av ditt lår
-
Luta dig mot dina underarmar (fig. 1)

Övning:
-
Rulla långsamt bakåt och framåt över rullen längs hela längden av framsidan av ditt lår, dvs. från ditt knä till höften
-
Du kommer att känna tryckpunktsbehandlingen i musklerna på framsidan av ditt lår (fig. 2)
- Håll din bål rak och låt musklerna på lårets framsida slappna av – så långt det är möjligt
-
Övningen kan vara en aning smärtsam i början, men smärtan ska aldrig vara värre än vad du lätt kan tåla.
Calf rolling
Involverade muskler: vadmuskler
Utrustning:
- Fasciarulle (t.ex. från Blackroll®)
- Valfritt: yogamatta
Startposition:
-
Sitt på golvet
-
Placera en fot på golvet och lägg vaden på det andra benet på fasciarullen
-
Luta dig tillbaka på dina händer (fig. 1)

Övning:
-
Lyft rumpan lite från golvet
-
Rulla nu långsamt med hela vaden bakåt och framåt, dvs. från hälsenan till knävecket
-
Nu kommer du att känna tryckpunktsbehandlingen i dina vadmuskler
-
Din bålmuskulatur hjälper dig att röra på din kropp (fig. 2)
-
Låt tårna peka nedåt så att dina vadmuskler är avslappnade
-
Övningen kan vara en aning smärtsam i början, men smärtan ska aldrig vara värre än vad du lätt kan tåla
Variationer:
- Gör övningen svårare genom att rulla båda ben
- Gör övningen svårare genom att korsa benen
Fysioterapiövning
Excentriska stärkande övningar2 för patellaligamentet är ett annat effektivt konservativt behandlingsalternativ. Detta har bekräftats i ett flertal olika studier3. Regelbundna knäböjningsövningar (knäböjningar på ett ben) på ett kilunderlag med en lutning på 25° kan ha en positiv inverkan på behandlingen av patellatendinit.
Knäböjningar
Startposition:
- Stå med det dåliga benet på ett kilunderlag (decline board) med en lutning på 25° (i nedförslutning) (fig. 1).
- Lyft det friska benet (fig. 1).
Övning:
- Böj långsamt det dåliga benet (böj knäet i högst 60°) (fig. 2).
- Håll kvar kortvarigt i slutpositionen (fig. 2).
- Gå tillbaka till startpositionen med det friska benet (fig. 3).
Viktigt!
- Ryggen ska vara rak.
- Låt inte det dåliga knäet böjas inåt (kobenthet).
Dosering:
- Upprepningar, omgångar: Börja med en omgång (= 1 × 15 upprepningar). Öka detta till två omgångar (= 2 × 15 upprepningar), och sedan till tre omgångar (= 3 × 15 upprepningar) så snart det föregående skedet går att genomföra utan smärta.
- Ökad svårighetsgrad: Träna med en tung ryggsäck så snart du har vant dig vid övningarna.
- Vila mellan omgångarna: Vila i 1–2 minuter mellan omgångarna.
- Frekvens: Två gånger dagligen.
- Behandlingsperiod: Följ programmet i minst 12–16 veckor.
Ökad svårighetsgrad
Startposition:
- Träna med en tung ryggsäck. Fyll därför en ryggsäck med vikter (t.ex. vattenflaskor).
- Stå med det dåliga benet på ett kilunderlag (decline board) med en lutning på 25° (i nedförslutning).
- Lyft det friska benet.
Övning:
- Böj långsamt det dåliga benet (böj knäet i högst 60°).
- Håll kvar kortvarigt i slutpositionen.
- Gå tillbaka till startpositionen med det friska benet.
Viktigt!
- Ryggen ska vara rak.
- Låt inte det dåliga knäet böjas inåt (kobenthet).
Dosering:
- Upprepningar, omgångar: Börja med en omgång (= 1 × 15 upprepningar). Öka detta till två omgångar (= 2 × 15 upprepningar), och sedan till tre omgångar (= 3 × 15 upprepningar) så snart det föregående skedet går att genomföra utan smärta.
- Öka vikten gradvis allteftersom du vänjer dig vid belastningen.
- Vila mellan omgångarna: Vila i 1–2 minuter mellan omgångarna.
- Frekvens: Två gånger dagligen.
- Behandlingsperiod: Följ programmet i minst 12–16 veckor.