Skip to Content
- Säker onlineshopping
- Snabba leveranser
- Hög produktkvalitet
- Vårdpersonal? Klicka här
Stukning

Kategorier
Händer snabbt: Vrickning
Vad är en stukning (vrickning)?
A sprain is defined as a violent wrench or twist of the ligaments which causes pain and swelling of a joint. A sprain is not a dislocation. They are one of the most common sports injuries.
Usually, treatment of sprains is straight forward. The pain usually subsides by itself. The injured area often becomes bruised and swollen. A sprain commonly happens to ankle, foot, wrist, thumb, knee, leg or back joints.
However, in some cases, ligament, capsule or muscle injuries caused by sprains can lead to chronic joint instability. To avoid this, you should consider the following actions.
Kronisk ledinstabilitet
Kronisk ligamentinstabilitet kan leda till allvarligt slitage på brosken i leden och till artros. Därför rekommenderas ett besök hos en ortoped eller idrottsläkare även om stukningen till synes är ofarlig.
Orsaker – hur uppkommer stukningar?
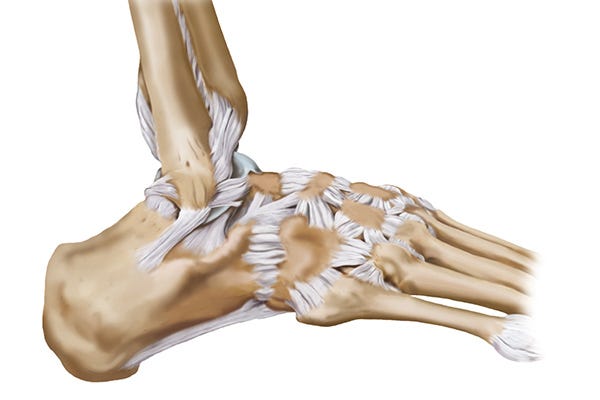
Vid en stukning överskrids ledens fysiologiska dvs. naturliga rörelsevidd på grund av yttre påverkan. Den här överskridande rörelsen i en led – som vanligtvis sker plötsligt – kan orsaka skador på de strukturer som stabiliserar leden.
Symptom och tecken – hur känner man igen stukningar?
Dessa är tecken på stukning:
- Smärta
- Svullnad i leden
- Blåmärken
- Begränsad rörelsevidd i leden
Om du upplever dessa tecken, ska du konsultera en allmänpraktiserande läkare, idrottsläkare eller ortoped för att utesluta allvarligare skador som till exempel sönderslitna ledband eller brutna ben.
Riskfaktorer för stukningar
En del människor har svaga ledband och har lättare att få stukningar än andra. Personer med högt fotvalv, fördröjd reaktionstid i musklerna eller muskelsvaghet drabbas också oftare.
Stukningar kan inträffa snabbt, särskilt under träning: Stukningar inträffar ofta när man spelar basketboll eller fotboll eller joggar på ojämn mark. Tum- och fingerleder kan till exempel stukas när man spelar handboll eller volleyboll eller åker skidor.
En annan klassiker är den stukade tån. När man går barfota och slår i en möbel eller halvöppen dörr.


Förebygga idrottsskador
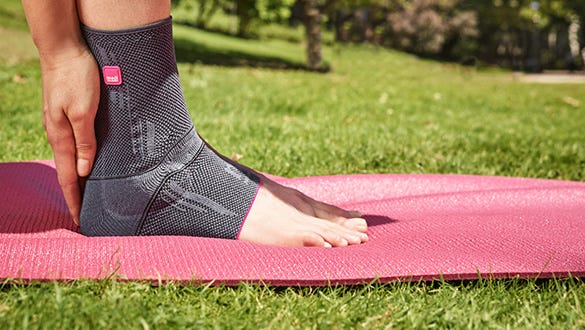
Om din fotled är instabil (eventuellt på grund av tidigare skador eller en lös ligamentapparat), kan stukningar på grund av vrickning ske lättare.
I så fall är det klokt att använda ett bandage (t.ex. i sortimentet med medi Levamed vriststöd).
Vid motsvarande obehag i handleden kan produkter i medi Manumed-sortimentet användas som stöd.
Ännu ett råd: Se alltid till att din fotbeklädnad är robust och lämplig för sitt ändamål. Detta gäller såväl för idrott och fritidsaktiviteter som för vardagslivet.
Produkter från medi
Stukningar – vad ska man göra? Behandling enligt RICE-regeln
Om fotleden eller någon annan del av kroppen är stukad, är RICE-regeln en bra vägledning till de första åtgärderna:
- R står för Rest (vila)
- I står för Ice (nedkylning)
- C står för Compression (kompression)
- E står för Elevation (högläge)
Rest (Vila): När en stukning inträffar, ska du omedelbart avbryta din fysiska aktivitet. Den drabbade delen av kroppen ska immobiliseras och får inte längre belastas.
Ice (nedkylning): Börja genast kyla ned den drabbade leden. Detta motverkar svullnaden. Dessutom bidrar nedkylning alltid till att lindra akut smärta.
Compression (Kompression): Genom att linda ett elastiskt förband runt leden och spänna det en aning, åstadkoms den kompression som behövs i det skadade området. Under den akuta fasen är det bäst att kombinera tryckförbandet med en kylpackning och senare med en smärtstillande salva. Om det är nödvändigt ur medicinsk synpunkt, kan läkaren också ordinera ett bandage av kompressionsmaterial för att stödja läkningsprocessen. Beroende på skadans svårighetsgrad kan läkaren även använda en ortos (skena) i behandlingen.
Elevation (Högläge): Det sista steget är att placera den drabbade kroppsdelen i högläge.
Viktig upplysning
- Om inget annat rekommenderas av din läkare eller terapeut, ska du följa de anvisningar om frekvens som anges.
- Om obehag uppkommer under eller efter en övning, ska du sluta med övningen och konsultera din läkare eller terapeut.
- Ta dig tid och utför övningarna noggrant.
- Beroende på läkningsfas kan du utföra övningarna med eller utan band. Diskutera behandlingsplanen.
Diskutera behandlingsplanen med din läkare.
Exercise for coordination
Forward lunge

Starting position:
- Legs shoulder width apart
- Keep your back straight
Exercise:
- Take a small lunge step forward with the affected leg
- Keep centre of gravity in the centre of the body
- Then return to the starting position
- Pay attention to a straight leg axis
Frequency:
- 3 sets x 15 repetitions
Side lunge

Starting position:
- Legs shoulder width apart
- Build up basic body tension
Exercise:
- Use the affected leg to perform a medium lunge in the given directions
- Always assume the starting position in between
- Pay attention to a straight leg axis
Frequency:
- 3 repetitions
Note: Only do this exercise if you can perform the “Forward lunge” exercise without any problems.
Knee raise

Starting position:
- Open legs shoulder wide and bend slightly
Exercise:
- Lift the unaffected leg from the ground and hold it briefly
- Stabilising movement only from the knee and ankle joint
- Pay attention to a straight leg axis
- Keep upper body steady
Frequency:
- 3 repetitions, each lasting 20 seconds
Knee raise with aids

Equipment:
- Airex® Pad / alternatively: folded towel
Starting position:
- Open legs shoulder wide and bend slightly
Exercise:
- Raise the unaffected leg from the ground
- Stabilising movement only from the knee and ankle joint
- Pay attention to a straight leg axis and keep upper body steady
Frequency:
- 3 repetitions, each lasting 20 seconds
- Note: Only do this exercise if you can perform the “Knee raise” exercise without any problems.
Jump

Starting position:
- Legs shoulder width apart
- Keep your back straight
Exercise:
- Make a small jump forward with the affected leg
- Land on one leg
- Stabilise the landing position and hold it briefly
- Pay attention to a straight leg axis
Frequency:
- 10 repetitions
Note: Only do this exercise if you can perform the “Knee raise with aids” exercise without any problems.
Strengthening exercises
Pulling your toes upwards

Starting position:
- Put your hands behind your back as support
- Stretch out the affected leg
- Bend the unaffected leg
Exercise:
- Pulling your toes upwards
- Press the outside of the foot statically against a fixed object (e.g. against a wall or a door frame)
- Change: Press the inside of the foot against a fixed object
Frequency:
- 3 sets x 10 repetitions per side
- Hold the position for 2-3 seconds
Pulling your toes upwards with aid

Equipment:
- Thera Band®
Starting position:
- Put your hands behind your back as support
- Stretch out the affected leg
- Bend the unaffected leg
Exercise:
- Pulling your toes upwards
- Put Thera Band® around the ball of your foot and keep tension
- Turn ankle joint outwards
- Then take up the initial situation
- Change: Turn ankle joint inwards
Frequency:
- 3 sets x 15 repetitions
Note: Only do this exercise if you can perform the “Pulling your toes upwards” exercise without any problems.
Heel raise (sitting)
")
Starting position:
- Sitting upright on the chair
- Do not lean back on the chair
- Place both feet on the ground
Exercise:
- Apply light pressure to knees with the ball of your hand
- Lift heels off the ground (max. 20 degrees)
- Then take up the initial position
Frequency:
- 3 sets x 15 repetitions
- Hold the position for 1-2 seconds
Heel raise (standing)
Starting position:
- Legs shoulder width apart
- Keep the pelvic and torso axis stable
- Place the ball of your foot on a stepper or alternatively on a stair step
Exercise:
- Lifting and lowering the body using the ankle joint
Frequency:
- 3 sets x 15 repetitions
Note: Only do this exercise if you can perform the “Heel raise (sitting)” exercise without any problems.
- To make it easier, you can also do this exercise on a flat surface.
- It is recommended to hold on to the wall or stair railings to help keep your balance.
Exercises for mobilisation
Roll on the exercise ball

Equipment:
- Exercise ball
Starting position:
- Sit up straight on the exercise ball
- Place both feet on the ground
- Keep your back straight
- Place hands flat on the knees
Exercise:
- Sitting on the exercise ball, roll forward and back slowly (max. 20 degrees)
Frequency:
- 3 sets x 15 repetitions
Pressure exercise

Starting position:
- Sitting upright on the chair
- Do not lean back on the chair
- Place both feet on the ground
- Put a towel under your feet
Exercise:
- Slowly push the towel back and forth with your feet (max. 20 degrees)
Frequency:
- 3 sets x 15 repetitions
medi products for sprains
The rigid half shells of the ankle brace M.step* provide excellent stabilisation during pronation and supination movements (turning of the foot).
The modular design of the Levamed stabili-tri** supports functional treatment and can be adapted to the particular phase of healing (stage-adapted) for safe and reliable treatment and mobilisation of the patient. The joint is stabilised and relieved by the interaction between the compressive knitted fabric, inelastic stabilising element and additional strap.